Fix Oops! Google Chrome Could Not Connect To Errors
- View
- Track
Google Chrome can be configured to save the browsing session on close so that the user can continue the session on the next startup. All websites and services that had been open in tabs are reopened on the next browser start. It sometimes happens that Google Chrome cannot open a website, displaying a dreaded “Oops! Google Chrome could not connect to” error instead.
Strange if the site was working fine some time ago. Users who check the website in another browser installed on the system would find out that the page loads and displays fine in that browser which leads to the only possible conclusion that it is a Google Chrome problem.

oops google chrome could not connect to
The majority of page loading problems are a result of the DNS Fetching in Google Chrome. DNS Pre-fetching stores information in the browser to speed up the loading of websites in Chrome. It can, under certain circumstances, result in connection problems. This can happen if a wrong or outdated DNS is stored in the browser for the website in question.
DNS Fetching speeds up page loading by about 250ms. Chrome users who experience connection difficulties regularly might want to try turning the feature off to see if it resolves the issues.
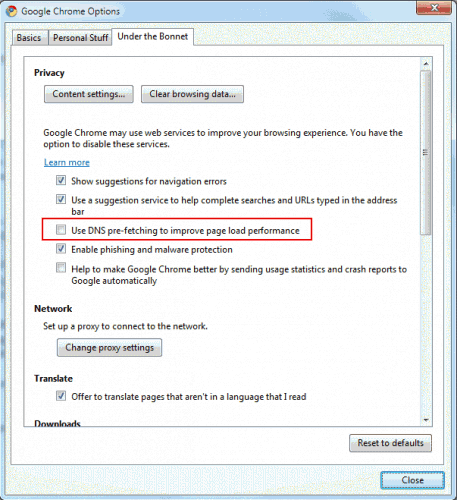
This is done in the Chrome options. A click on the Wrench icon in the upper right corner and the selection of Options opens the settings window of the web browser.

dns pre fetching
Load the Under the Bonnet tab and locate the entry Use DNS pre-feching to improve page load performance. Remove the checkmark from that setting to disable DNS fetching in the browser. The websites with connection issues should load fine immediately.
© Martin for gHacks technology news, Software And Internet Tips For The Geek In You, 2010.
- 7712 reads
- Feed: gHacks technology news
- Original article

Post new comment