google chrome tips
Google Chrome hanging on startup
For the past two days I have been noticing a issue with Google’s Chrome browser. Whenever I would start the browser, it would hang for a couple of seconds before the tabs of the previous session were loaded. This happened even if I had only one tab open that needed to be restored, so that I was pretty certain it was not caused by tab overload. I also tried switching to load the new tab page only on start up of the browser, which also did not resolve the issue. I’m experiencing hangs not only in Chrome Dev but also in Chrome Canary, which are both installed on a Windows 7 64-bit pro system.
- I have disabled all plugins and extensions to see if the issue was caused by addons but that was not the case either.
- I then tried to launch the browser in Incognito Mode and that too hung on startup for 5-10 seconds before the browser became responsive.
- Next try, a new profile. Starting Chrome with the parameter –user-data-dir=/tmp/test_profile_dir did not resolve the hanging on startup either.
- Clearing the complete browsing history did not have an effect either.
- Verified that known Chrome hang and crash issues where not causing the freezes on startup
- A restart of the PC did not resolve the issue either.
I grew pretty desperate at this point, and decided to uninstall Google Chrome on the PC to start with a clean installation of the browser afterwards in hope that this would resolve the freezes that I was experiencing. I first uninstalled Chrome Dev from my Windows system and all of the data it contained and restarted the computer afterwards. Once I did that I downloaded the installer from Softpedia, ran it, and started Chrome.
Guess what, the browser started without hangs or freezes. To make sure that this was not just a one time thing or so, I decided to open a few tabs before restarting it to see if that was the case. Well, Chrome is starting up fast and without issues now, even after restarts of the PC and some heavy use.
Keep in mind that you may lose data if you uninstall Chrome this way. If you do not want that to happen, configure Chrome to sync settings with a Google Account. This may however have the consequence that the cause for the problem is synced with your new Chrome installation so that you are experiencing it again.
Have you experienced issues with Chrome before in this regard? How did you resolve them?
- Add new comment
- Read more
- 950 reads
- Feed: gHacks technology news
- Original article
How to disable Google Chrome’s Action box + icon
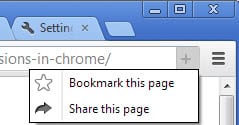
If you are running Chrome Canary, and maybe other versions of the web browser as well, you may have noticed the + icon that Google has added to the browser’s address bar. If you do, you also may have noticed that the classic star icon, used to add a bookmark to the browser, has been removed at the same time.
The bookmark star has been replaced by the rather blunt plus (+) icon that Google calls Action Box. The reason for this is that it displays multiple actions when clicked on. It first lets you bookmark the page, and second share the page. Chrome stable users can enable the Action Box in the chrome://flags experimental feature listing. A restart of the web browser is required afterwards. I could not get the plus icon to display its contents though.
Clicking on the Share this page entry displays a popup highlighting Chrome extensions that you can use to share websites that you find interesting. This did not work at the time of writing in Chrome Canary, as no popup was displayed on the screen. The feature did work in the latest Chrome Dev version though.
A click on add to Chrome installs the extension right away in the browser bypassing the Chrome Web Store. The more suggestions link opens a custom store page highlighting all sharing extensions that work with the feature. Available extensions include WordPress.com, Twitter, Flattr, Gmail, LinkedIn, Tumblr, Google+, Reddit and AddThis. Bookmarked pages are still displaying the yellow star icon in the browser’s address bar.
- Add new comment
- Read more
- 765 reads
- Feed: gHacks technology news
- Original article
Google Chrome: Control website permissions from the address bar
If you are using Google Chrome 23 or higher you may have noticed a change to how website permissions are controlled in the browser. To do that in previous versions, you had to open the content settings of the browser to manage which websites could load images, cookies, JavaScript, handlers, plugins or popups and which could not. Chrome by default is configured to allow all contents but popups on all websites. You can use exceptions to forbid the use on select websites, or switch to blocking certain types of contents on all websites but on sites in your exception list.
Up until now you had two options to manage content settings. First by opening the content settings in the Chrome settings dialog, or, if contents are blocked on a site, with a click on the icon indicating this in the browser’s address bar.
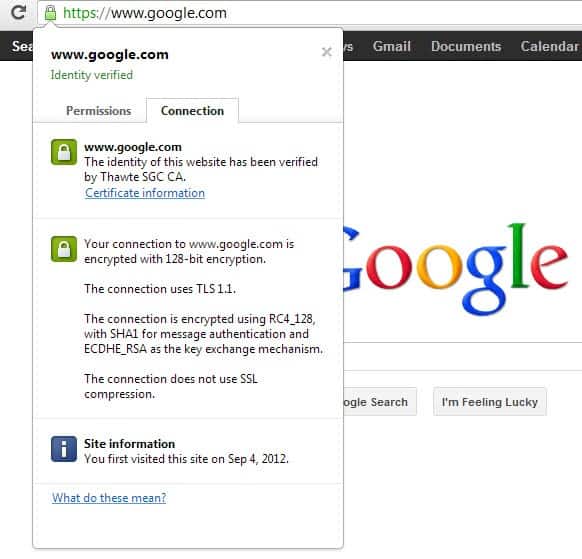
This changes with Google Chrome 23 as you can now click on the security icon on the left of the web url in the browser’s address bar to display content settings right there.
The menu has been divided into two tabs, permissions and connection. The permissions tab displays cookie and site data information at the top, and below that all permissions of the website you are on.
Cookies and site data displays allowed and blocked first and third party cookies. A link to the cookie manager provides you with options to remove some or all of the cookies with just a few clicks.
Permissions let you change the following permissions for the domain you are on (allowed by default, always on, always blocked)
- Images
- JavaScript
- Plugins
- Popups
- Location
- Notifications
- Fullscreen
- Mouse Lock
- Media
Chrome users can now edit permissions for a single website directly in the main browser window instead of having to manage exceptions for content settings in the browser’s options. Changes take effect after you reload the page or navigate to a different page on the domain.
The security information have been moved to the connection tab instead. Only the domain name and whether the identity has been verified are displayed on both pages. All remaining security information are displayed on the connection page.
The ability to control permissions right from the page you are on makes the whole process easier to handle. Definitely an improvement for Chrome users who use the permission feature in the web browser.
- Add new comment
- Read more
- 1130 reads
- Feed: gHacks technology news
- Original article
How To Synchronize Google Chrome Data Without Chrome Sync
Synchronizing browser data between multiple devices can be a blessing. Imagine having all of your bookmarks and passwords at your disposal, no matter where you go, or what computer you use to connect to the Internet. In reality, syncing is limited in several ways. It first is limited to a specific web browser. You cannot just sync your Firefox data with Google Chrome, or Internet Explorer’s with Opera. While there are third party tools out there that can sync some data, like bookmarks, you won’t find a tool that can synchronize everything.
The second limitation is that you need an account if you use the built-in synchronization features. For Google Chrome, a Google account is required that you need to be signed in for the syncing to work.
Syncing data without Chrome Sync
If you do not want to sign in to your Google account in Chrome, or do not have an account at all, you may be interested in alternatives that help you synchronize data between multiple systems.
To do that, you need two tools:
- A tool to create symbolic links
- Storage space in the cloud that you can access locally (like Dropbox)
The process
Google saves the Chrome user folder into the C:\Users\username\AppData\Local\Google\Chrome\User Data in Windows 7 and Windows Vista. Windows XP users find it in C:\Documents and Settings\username\Local Settings\Application Data\Google\Chrome\ instead.
All you need to do know is to place that folder in your cloud storage, and point the original data folder to it, to have it synchronized automatically whenever you switch computers. Keep in mind though that will run into issues if you have Chrome open simultaneously on multiple systems. If that is a requirement, you are better off using the built-in synchronization. The process obviously only works for systems that can access the cloud storage.
As far as tools go, you can use Steammover or Dropboxifier for that. Steammover, originally designed for users of the gaming platform Steam who want to move some of their installed games to a new drive, can be used to create symbolic links for all kinds of folders.
You also need a Dropbox account, or a comparable cloud hosting account that you can access as a drive or folder on your system.
Here is how this is done.
Attention: Close all open instances of the Google Chrome browser on your system before you proceed.
Start Steam Mover and select your Google Chrome user directory as the Steam Apps Common Folder, and a new folder in your Dropbox directory as the Alternative Folder.
You should see a folder list being populated once you have selected the Chrome user folder. Now mark all folders with the left mouse button while holding down the Shift key, or press Ctrl-A to do it, and click on the right arrow icon at the bottom of the window afterwards.
Now that you have set it up on one PC, you need to repeat the steps on the remaining devices. Install Dropbox first there to synchronize the Chrome files with the local PC or device. I’d suggest you empty the directories of your Chrome user directory on those devices before you use Steam Mover to avoid syncing conflicts.
- Add new comment
- Read more
- 762 reads
- Feed: gHacks technology news
- Original article
How To Uninstall Google Chrome Themes
I tested the My Chrome Theme yesterday which allowed me to create a custom basic theme for the Chrome browser. It was quite an interesting experience, as it offered options to change the background image and various interface colors. One of the effects was that the default theme was replaced by the custom theme that I created with the help of the extension. After trying the extension for some time, I decided to remove the installed theme again to restore the default theme in the browser. And that’s where the searching for a theme removing option began.
Uninstall Google Chrome Themes
Since I never uninstalled themes before in the browser, I had no clue how to do that. I first tried to find the installed themes in the extensions listing, only to find out that the themes were not listed there. I then started to look through the options to find the setting that would allow me to switch the currently installed theme back to the browser’s default theme.
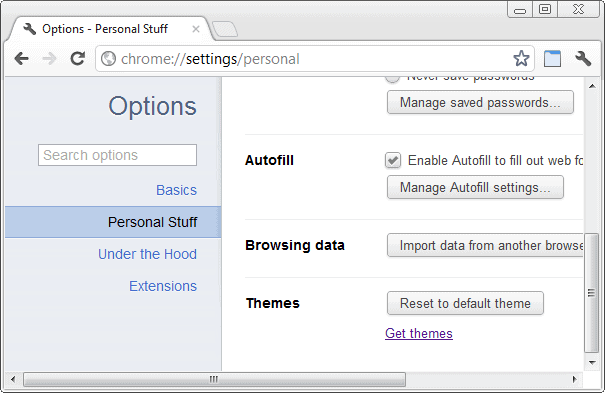
After some digging in the options I discovered the themes setting under Personal Stuff. It consisted of a single button which would reset the theme of the browser to the default theme when clicked on.
A click on reset to default theme restores the default browser theme. Since there is no theme listing available in the browser, it appears as if Chrome only keeps a copy of the current theme and the default theme. All other themes seem to be replaced automatically whenever a new theme or the default theme get installed in the browser.
- Add new comment
- Read more
- 745 reads
- Feed: gHacks technology news
- Original article
List Pages That Get Prerendered by Google Chrome
Prerendering in the best case speeds up specific processes. When it comes to web browsers the technology could pre-load and render websites to display them faster for the user. This only works if the browser gets the site right. If you look at a standard web search for instance, you will get ten search results by default plus other pages that you could click on. It would be a tremendous waste of processing power and bandwidth if the browser would load all of those pages, especially if the user would only click on one page of the results.
The Google Chrome web browser, and Chromium as well, use prerendering in a limited way. It may be used when you enter a phrase into the Chrome address bar. But which page or pages do get prerendered when this is happening?
That’s easy to find out (thanks to who posted a short demonstration video on YouTube). All you need to do is to open the Google Chrome or Chromium Task Manager to see which pages get prerendered by the web browser.
You can open the Chrome Task Manager with a click on the Wrench icon, the selection of Tools and Task Manager. You can alternatively use the keyboard shortcut Shift-Esc to bring up the Task Manager directly.
Look for Prerender: entries in the Task Manager. The indicator is followed either by the site url that got prerendered or the page title. It may still take time to identify the prerendered link on the page as Google is not displaying the information in the web browser.
Prerendering in the web browser is automatically enabled. Users who do not want to use the feature can disable it the following way. Enter chrome://flags in the address bar and locate the “Prerender from omnibox” option.
Enables prerendering of suggestions from the Omnibox and predicts appropriate network actions (prerendering, Instant, DNS preconnect) by calculating a confidence value for each Omnibox result.
Switch to disabled in the pulldown menu to turn the feature off.
- Add new comment
- Read more
- 937 reads
- Feed: gHacks technology news
- Original article
Disable Google Chrome’s Native PDF Viewer, Flash Plugin
When you look at Google Chrome’s feature set and compare it to that of other browsers like Opera, Internet Explorer or Firefox, you will come to the conclusion that web browsers are more alike than they are different. Two items that will definitely be on the list are the built-in PDF viewer and the native Adobe Flash plugin. (Firefox may get a native pdf viewer in future versions)
Google Chrome users can open pdf documents directly in the browser. While the viewer is not comparable in functionality to desktop pdf readers, it is certainly enough to read a document online.
And native support for Adobe’s Flash technology ensures that Chrome users are automatically updated to the newest version whenever it is released, which improves overall security significantly.
Some Chrome users on the other hand may not want to use the native plugins of the Chrome browser. This can be the case if they have noticed that the Flash plugin is acting up or if they have installed a feature rich pdf reader on their system that they prefer to use.
Chrome, even with another Flash or PDF reader plugin installed, continues to use its native plugins for Flash and PDF contents (see Why are Two Flash Player Plugins Running In Google Chrome? for instance for an explanation).
Users of the Chrome web browser need to disable the native plugins before they can use third party plugins or software instead. This is done by entering chrome://plugins/ in the Chrome address bar and hitting enter.
The page that opens displays a list of all plug-ins currently installed in the Chrome browser. Relevant for this guide are the Flash and Chrome PDF Viewer plugins. A click on Disable below the Chrome PDF Viewer disables those capabilities in the browser.
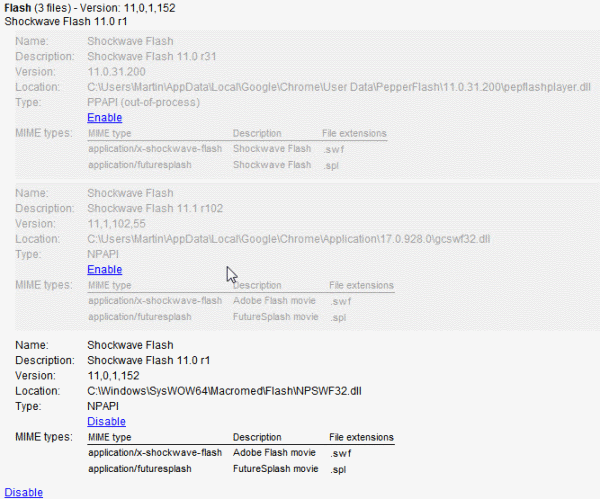
In regard to Flash, it is a bit more complicated. It is necessary to click on Details first to display all installed Flash plugins in Chrome. Locate the Flash plugin that has its location in the Chrome application folder and click the disable link to disable it. Make sure another Flash plugin is still active if you want to use the technology on the Internet.
That’s how you disable both the native Flash plugin and the native pdf viewer in Google Chrome.
Are you using Google Chrome’s native plugins? Or did you notice issues using those plugins?
- Add new comment
- Read more
- 1192 reads
- Feed: gHacks technology news
- Original article
How To Clear Individual Cookies In Google Chrome
Question on how to clear individual cookies in the Google Chrome web browser just came up and I thought I write a small guide here on Ghacks about it. Google Chrome, just like any other modern web browser, accepts all cookies by default. Cookies are small data packages that are saved by domains on your computer. They can be used for positive things like saving preferences or session data, and negatively perceived things like tracking the user on the Internet.
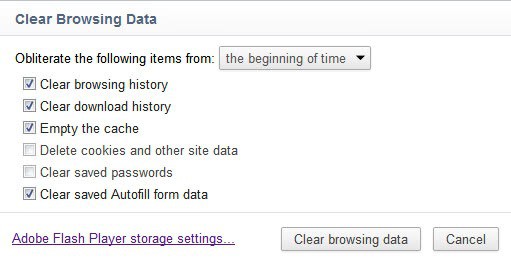
Google Chrome users can clear all browsing data, which includes cookies but also other data like the browsing and download history, by clicking on the wrench icon in the toolbar and selecting Tools > Clear Browsing Data from the menu that pops up.
It is alternatively possible to use the keyboard shortcut Ctrl-Shift-Del for the same effect. A window is displayed where the data can be cleared.
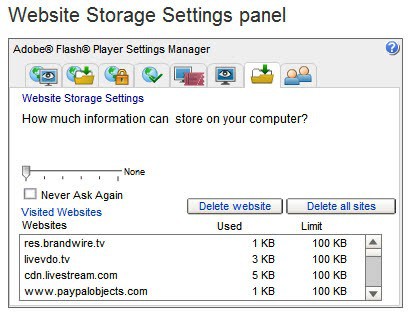
Please note that there is a link to the Adobe Flash Player storage settings. If you click on that link you will be taken to Adobe’s Website Storage Settings panel where you can delete all or select Flash cookies.
If you go back to the Chrome browser you may have noticed that the clear browsing data window does not offer to clear individual files. Sometimes you may want to delete a specific cookie or a set of cookies only. This can be handy for web developers testing a new site feature, users who accidentally visited a site and want to delete its traces or users who want to clear personalized data.
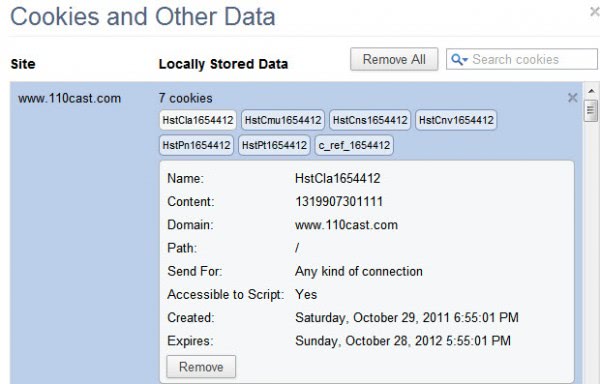
The easiest way to clear individual cookies in Google Chrome is to enter chrome://settings/cookies into the address bar. This opens the cookies and other data listing in the browser. All stored cookies are displayed here. It is possible to remove all cookies or search for individual cookies.
A click on a site displays all cookies stored by that site on the computer. It takes another click to display detailed information about the cookie and the Remove button. If you click on Remove the selected cookie will be deleted from the system.
And that’s how you delete standard and Flash cookies in the Chrome web browser individually.
- Add new comment
- Read more
- 1102 reads
- Feed: gHacks technology news
- Original article
Why are Two Flash Player Plugins Running In Google Chrome?
Most users of the Google Chrome web browser know that Google has integrated Adobe’s Flash Player in cooperation with Adobe into the web browser. The core advantage here is that Google can update the Flash plugin in the browser for its users. That’s a stark contrast to other web browsers like Internet Explorer, Firefox or Opera, where the user has to make sure that Flash updates are installed in a timely manner to protect the computer system from possible exploits and attacks.
If you look at the plugin listing in the Chrome web browser you may notice that the Flash listing says something like Flash (3 files) or Flash (2 files). You need to click on Details on the page to see what’s going on there.
You may notice that multiple Flash plugins are loaded in the Chrome web browser instead of just the native plugin. You can click on the Disable or Enable links to disable or enable specific Flash versions in the browser. This can be handy for Flash developers who need to test their applications in a different version of Flash, and for end users who do not want multiple running plugins in the owser.
Multiple enabled Flash plugin versions in the browser are according to Google.
It’s normal to see two Flash files in about:plugins. When both are listed as enabled, Google Chrome uses the built-in version by default, so you shouldn’t have to specify which one to use unless you specifically want Chrome to use the system version instead (has ‘NPSWF32.dll’ in the location field). Keep in mind that if you use the system version, you’re responsible for keeping Flash updated while the built-in version will update automatically via Chrome’s auto-update mechanism.
If multiple Flash plugins are enabled and the native plugin is one of them, then that plugin is used to display Flash contents in the Google Chrome web browser. This does not explain why a second Flash plugin is enabled in the browser, as it does not make sense if the native Flash plugin is always used if active.
My suggestion would be to disable the non-native Flash plugin in Chrome to be on the safe side.
- Add new comment
- Read more
- 1299 reads
- Feed: gHacks technology news
- Original article
Google Chrome Tips Beta Extension
If you are a new Chrome user, or an old one who is now used to working with the browser in a certain way, you may be interested in tips to get the most out of the web browser. Maybe it is basic tips that can really help you improve your workflow, for instance by searching websites directly from Chrome’s address bar instead of loading a search engine’s website first to do that, or more advanced tips that involve keyboard shortcuts.
Google recently released a first party extension for the Chrome browser with the purpose of providing Chrome users with tips to use the web browser more efficiently.
The extension will display tips when it recognizes ineffective behavior, for instance if a user uses only windows and no tabs to browser multiple websites.
The core question here is obviously if those users would be able to find and install the Chrome Tips extension, and the answer is probably no.
Regardless of that oversight in design, it can be handy if you do not mind running the extension in the background while working in the browser.
The extension will display tips in a small toolbar on top. The core issue that I have with the extension is that the tips are time and action based, which means that you may never see a tip coming up if you are an advanced user.
I tested the extension for a long time and did not see a single tip come up, hence the lack of a screenshot.
If you open the constants.js file of the extension you will see all tips listed in the interface. Here are a few examples of the tips listed:
- Key for tip when user needs to be educated about switching between tabs.
- Key for tip when the user needs to be educated about pinned tab feature.
- Key for tip when user needs to be educated about browsing in private.
- Key for tip when the user needs to be educated about search from omnibox.
The extension in its current state offers 13 different tips. That’s not a lot and explains why some users may never see tips displayed in the browser. I personally would have preferred a link somewhere in the browser user interface to a static page that lists all the tips.
The idea is interesting especially since the extension can display tips whenever it recognizes ineffective user behavior. Still, a lot more tips and the option to display them directly would be handy.
Chrome users can install Chrome Tips official Chrome Web Store.

I also noticed a new design of the extensions listing in Chrome Dev. Not sure for how long it has been there but it looks clean and really nice.
- Add new comment
- Read more
- 1073 reads
- Feed: gHacks technology news
- Original article
5 Google Chrome Tips
In the comments to Tips to Master Google Chrome you told us to post more Chrome tips. This article offers five Chrome tips that you may not have heard about before. These little tips help you in your daily Chrome routine, they may speed up things further or highlight a feature that may help you in another way.
Not everything may appear to be useful on the other hand, as it depends largely how you use the Google browser. Lets start with the tips collection.
1. Drag and Drop downloaded files
You probably know that it is possible to execute downloaded files right away by double-clicking them in the browser. You can also click on the down arrow next to a downloaded file to open the folder the file has been saved to. What you may not know is that you can drag and drop the file as well.
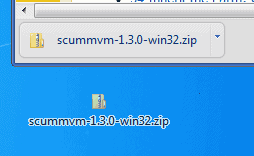
If you drag and drop downloaded files they are copied to the new location, for instance the desktop or another folder. You can even drag and drop downloads to programs like the email client Thunderbird.
2. Add, Edit Search Engines
Chrome uses Google Search as the default search engine. You can add and edit search engines with a right-click on the Chrome address bar and the selection of Edit Search Engines, or by going directly to Wrench > Options > Manage Search Engines.
You can add new search engines in the following way. Visit the search engine in Chrome and do a search for a term that you can easily located in the urlbar, for instance TEST. Copy the url and open the search engine options in Chrome as outlined above.

Paste the url into the URL field of a new search engine, and replace TEST with %s. Add a name for the search engine and a keyword. Whenever you want to search on that search engine, you simply enter the keyword first and then the search phrase.
Example:
Name: Bing
Keyword: b
Url: http://www.bing.com/search?q=%s&go=&form=QBLH
3. Unit Conversions
Chrome can convert units for you right in the address bar. Just enter a term like 10 meters in inch, 1000km in miles or 4+10 and you get the result shown in the suggestion window that opens up.

4. Keyboard Shortcuts
Chrome offers hotkeys for many operations, which are usually faster than using the mouse. Here is a list of keyboard shortcuts for Chrome that I use all the time.
- Ctrl-F, Opens the Find form
- Ctrl-T, Opens a new tab
- Ctrl-Shift-Del, Opens Clear browsing data window
- Shift-Esc, Opens Chrome’s task manager
- Alt-Home, Opens homepage in active tab
- Ctrl-Enter, Adds www and .com to the address in the urlbar automatically
- Ctrl-Shift-V, Copy Clipboard contents without formatting
5. Change the Zoom level
Did you know that it is possible to change the global zoom level and a page-only zoom level in the Chrome browser?
To change the zoom level of a specific page, you can use the keyboard shortcuts Ctrl+ and Ctrl-. These new zoom levels are set for the domain, and will stick even after you close the browser window.
Global zoom levels on the other hand are handled in the Chrome preferences. Click the Wrench icon and select Options to open the preferences of the browser. Click Under the Hood and locate the Web Content section there.

You can change the zoom level and default font size for all web pages here.
Closing
Have a Google Chrome tip of your own that you’d like to add to this collection? Let us know in the comments.
- Add new comment
- Read more
- 1295 reads
- Feed: gHacks technology news
- Original article
Tips to Master Google Chrome
Google Chrome is one of the leading web browsers and it has become increasingly popular with tech savvy folks as well as those who aren’t quite as tech savvy. The simplicity, usability and technicality make it one of the best browsers. Google Chrome is compatible with almost all the Operating Systems such as Windows, Mac or Linux. Google Chrome, though very simple to use, has a lot of features which are unknown and untested by many users. These features can enhance the usability of the browser and provide you with greater efficiency when browsing the web. Following are a few tips which can be used to enhance the performance of the Chrome web browser.
The Incognito mode

The incognito mode can be used as a stealth mode in effect. It turns off the browser tracking and does not allow the tracking of the web pages being browsed or the files that were downloaded to the user memory during a particular browsing session. The feature also automatically deletes the cookies and all the other temporary files which are related to the browsing session on Google Chrome. This provides an increased and improved level of privacy for highly sensitive and secured browsing such as processing online banking services, payment procedures and using various access credentials for starting up various web based applications.
Various methods to start Incognito:
Method 1: For using Incognito temporarily for a particular browsing session on a particular tab window.
Ctrl+Shift+N is a keyboard shortcut to initiate a new Chrome Window in Incognito mode. A Google Chrome web browser can be launched in Incognito mode directly from the taskbar in Windows by simply right clicking and selecting the option of “Open link in Incognito Window”. This will initiate the Incognito mode temporarily for a particular browsing session in a particular window tab where it is necessary for the information to be kept private and clear of tracking.
Method 2: For using Incognito continuously for different sessions at regular intervals.
In this method the browser is set in Incognito mode by default, and every time the browser is launched from a desktop shortcut it opens in Incognito mode. First right click the Google Chrome shortcut icon on the desktop and select properties. In the target field type “–incognito” (space dash incognito without quotes) at the end of the line and then click on the OK button. Once this procedure is complete, Google Chrome will be launched in Incognito mode every time the Chrome browser is opened through the shortcut.
Google Chrome Instant
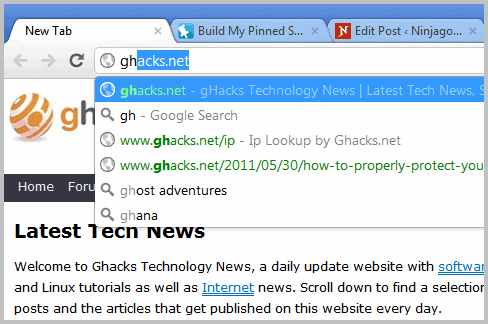
The Google Chrome Instant feature is an instant search tool feature which allows the browser to show dynamically updated webpages and search results instantly while the information is typed in the address bar of the browser, even before hitting the enter button. It is a smart search which gets dynamically updated as more information is typed in the address bar, until the desired results are found.
Enabling Instant:

Click on the wrench icon and select Options for Windows, preferences for Mac and Linux and Settings on Chrome OS. Now click the basics tab, and check the box next to “Enable Instant for faster searching and browsing”.
Chrome Instant may not work due to inadequate connection speed of the internet services or during certain inappropriate searches, when the instant feature is not triggered to show the search results instantly. Instant does not work in Incognito mode.
Do you think that these tips will help you? And are you likely to use them?
- Add new comment
- Read more
- 1152 reads
- Feed: gHacks technology news
- Original article
How To Remove Elements From Google Chrome’s New Tab Page
The new tab page of the Chrome browser does not display a white page, but links to features or modules of the web browser. It will for instance list the most visited websites, the recently closed websites, the new Google Chrome Apps web store and apps that have been installed from it as well as bookmarks and an add for the new Chrome notebook (which is shown to everyone even though only users from the US can apply to test it).
It got a bit crowded in there, especially with the introduction of the Apps section. Users who do not use the web store or apps may prefer to remove that element from the new tab page of the browser. Other users may prefer to hide the most visited or recently closed site listing instead, or the ad for the Chrome notebook.
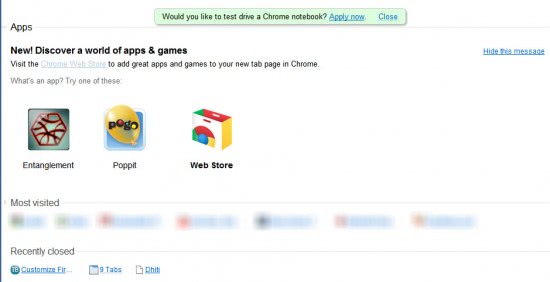
Chrome users who want to get rid of one feature or the other need to pay close attention to the page. There are two – light – elements on the new tab page, one next to the module heading which is always visible, and one at the rightmost location on mouse hover.
The left arrow / down arrow at the left of the module name can be used to expand or compress that listing on the new tab page. It reduces the space needed for the module but will not remove it from the new tab page.
The tiny x on the right while hovering on an entry on the other hand allows just that. Just move the mouse over the module that you do not want to see anymore on the new tab page and click it to remove it. But be careful with that, as there does not seem to be an option to restore the new tab page.
- Add new comment
- Read more
- 1667 reads
- Feed: gHacks technology news
- Original article
Disable This Type Of File Can Harm Your Computer In Google Chrome
Whenever you try to download an executable file in Google Chrome you are presented with the following confirmation prompt at the bottom of the browser: “This type of file can harm your computer. Are you sure you want to download..”. A save or discard prompt is displayed giving the user the option to either save the file to the local hard drive or discard the download. It still means that users need to move the mouse down to the prompt to select an option.
While I could not confirm it I read in user comments that even Linux users get the message.
![]()
Is there a way to get rid of the message? Yes and no. There is no switch to disable the confirmation prompt completely and retain the auto downloading functionality. There is no Chrome option or startup parameter that can be used to disable the This Type Of File Can Harm Your Computer message.
The only option that users have is to enable the option to ask where to save each file before downloading. It is not an ideal solution because it will spawn the download window on every download.
The window offers an advantage to the user. Instead of having to move the mouse to the Save or Discard prompt it is possible to complete the download by pressing enter on the keyboard, providing the right directory is displayed on screen.
There you have it. You either have the option to live with the “harm your computer” message or switch to the ask before download option to replace it with a download window.
I have not tested a third alternative: Download Managers. These programs should theoretically be able to intercept the downloads so that the files are downloaded automatic and without spawning the safety popup.
- Add new comment
- Read more
- 1951 reads
- Feed: gHacks technology news
- Original article
Enable Side Tabs In Google Chrome
All the talking about sidebar tabs today in Firefox reminded me that I wanted to write about a similar feature in Google Chrome, to be more precise in the Google Chrome dev releases and Chromium.
The developers of the browser have added a startup switch to enable side tabs. Users who are running a dev version of Chromium or Chrome can add the startup parameter –enable-vertical-tabs to enable the side tabs functionality.
Here is how it is done in detail (Windows):
Locate the Google Chrome icon, right-click it and select Properties. This opens the Google Chrome Properties window. Locate the Target field and add –enable-vertical-tabs at the end of it. Make sure there is a space between chrome.exe and the parameter.
A click on OK saves the new parameter. Start or restart Google Chrome. There is no visual indication of side tabs yet. They are activated by right-clicking a tab and selecting Use side tabs from the context menu.
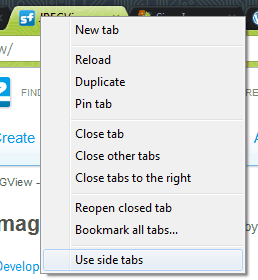
chrome side tabs
The current version seems to have problems drawing the side tabs right away. It is necessary to resize the screen, or minimize / restore it before the tabs are displayed in the sidebar.

chrome sidebar tabs
Each website is represented by its favicon, page title and a close button. It does not seem possible to change the width of the sidebar tabs yet. The title bar looks awfully empty as well with side tabs enabled.
A right-click on a tab in the sidebar and the selection of Use side tabs will revert the changes and move the tabs to their original location in the browser. It is once again necessary to resize / minimize the window before the tabs are displayed.
- Add new comment
- Read more
- 2837 reads
- Feed: gHacks technology news
- Original article
Fix Oops! Google Chrome Could Not Connect To Errors
Google Chrome can be configured to save the browsing session on close so that the user can continue the session on the next startup. All websites and services that had been open in tabs are reopened on the next browser start. It sometimes happens that Google Chrome cannot open a website, displaying a dreaded “Oops! Google Chrome could not connect to” error instead.
Strange if the site was working fine some time ago. Users who check the website in another browser installed on the system would find out that the page loads and displays fine in that browser which leads to the only possible conclusion that it is a Google Chrome problem.

oops google chrome could not connect to
- Add new comment
- Read more
- 7713 reads
- Feed: gHacks technology news
- Original article
How To Disable Geolocation In Google Chrome
The Google Chrome browser, much like Firefox, has a geolocation feature. Geolocation in this context means that websites and services can utilize the user’s location to provide personalized contents. A basic example would be a website that displays information based on the visitor’s location in the world. A weather report website could benefit from this for instance.
But geolocationdoes raise the alarm bells of some users who prefer not to be traceable at all. Geolocation is by default disabled in Firefox.
Google Chrome handles the matter slightly different. Geolocation is enabled but will only be accessible by a website or service is the user accepts it first.
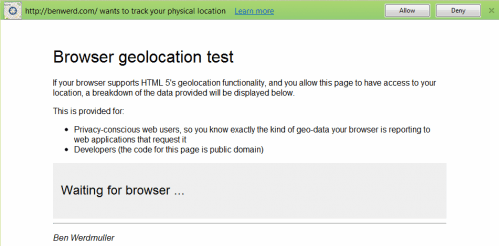
A confirmation message like the one above will be displayed whenever the user opens a website that makes use of the location feature in Google Chrome.
- Add new comment
- Read more
- 759 reads
- Feed: gHacks technology news
- Original article


